Edit part of a picture with Mask AI
Select an area with a brush, wand, lasso or shape, describe what should change and let the AI rework only that spot, then compare, undo or carry the result on to the next module.
What Mask AI is and when to use it
Mask AI is masked editing. You load one picture, mark the part you want changed, say in a sentence what should be there, and the AI reworks only the marked area while the rest of the photo stays as it was. It covers the jobs that a global prompt gets wrong: swap one object, remove another, change a background, extend the frame, restyle a region, or change a colour without touching the rest.
Compared with Image Studio (where you upload a ready-made mask file), Mask AI is where the mask is made: you paint and shape it directly on the picture, stack several selections as layers, and run the edit in the same screen. Compared with the photo editor, it is generative: it invents new pixels instead of adjusting existing ones.
| You want to | Mode |
|---|---|
| Put something new into a spot | Inpaint |
| Take an object out and rebuild what was behind it | Remove object |
| Keep the subject, replace what is behind it | Change background |
| Paint beyond the edges of the picture | Extend |
| Change the style of one region | Style |
| Say in plain words what to change | Instruction edit |
Loading a picture and the workspace
The start screen asks you to Choose an image (PNG, JPG or WebP, up to 20 MB) and offers a From library tab with your own pictures. A back link, Back to the generator, leads out. When the picture is loaded, the title bar shows its size in pixels and the workspace opens.
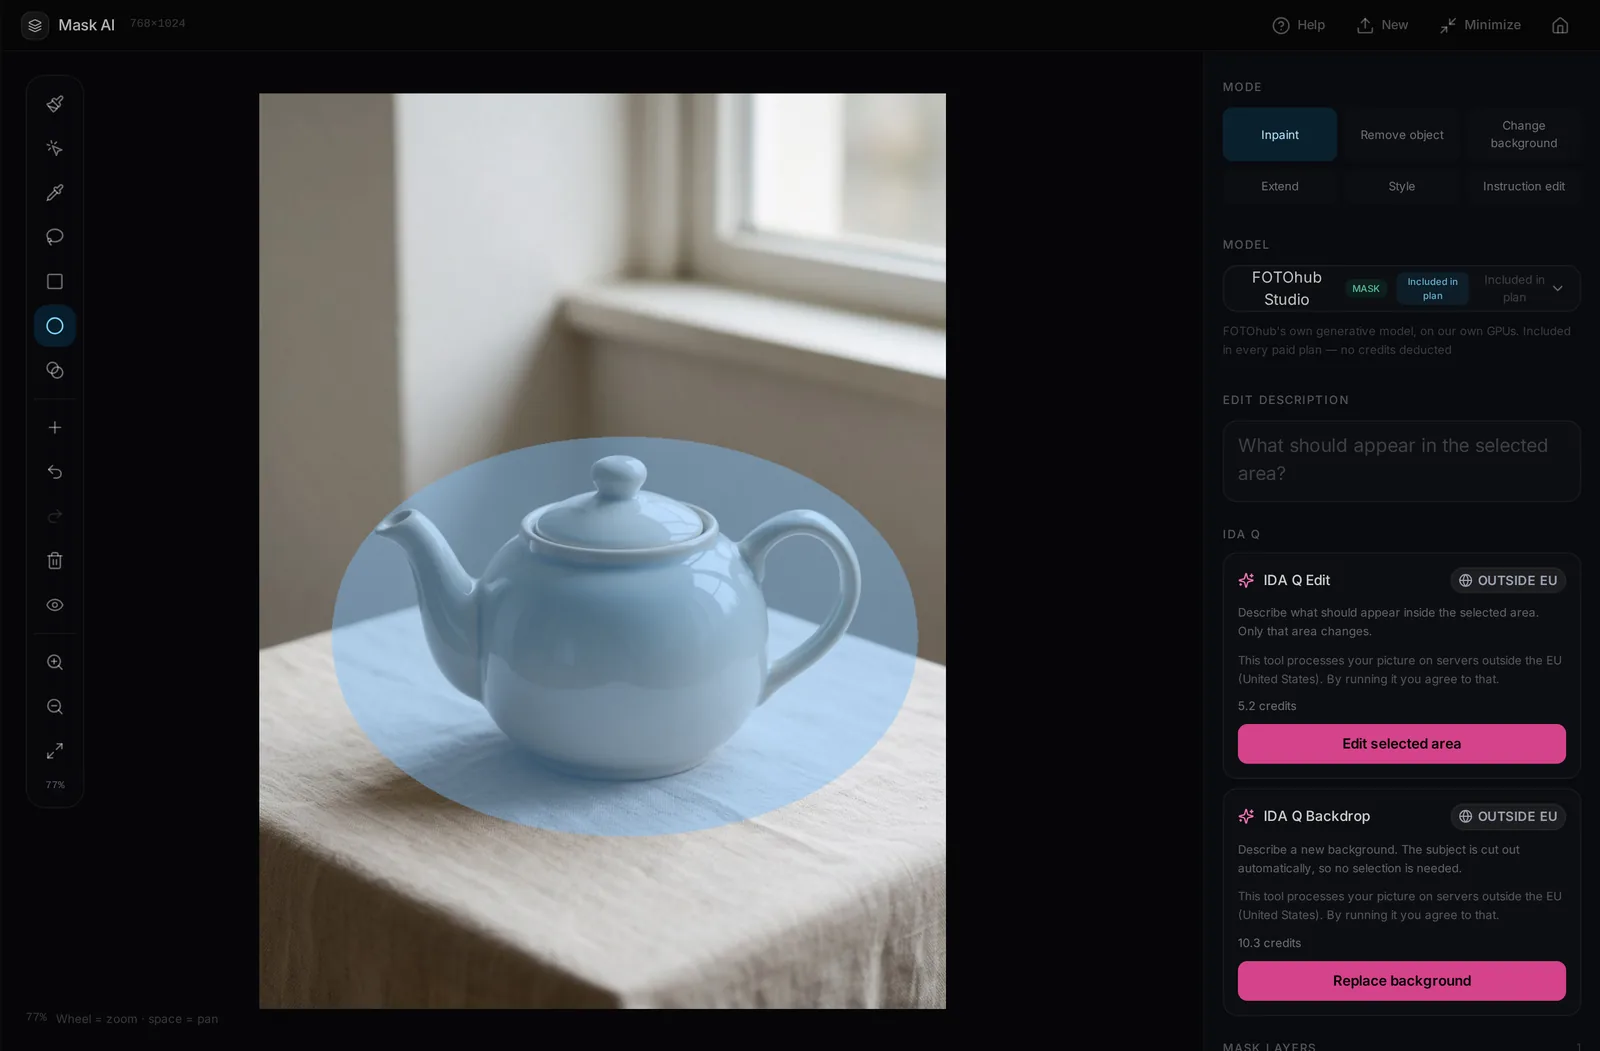
- Toolbar. Seven selection tools, then add and subtract mode, undo and redo (the history keeps 60 steps), clear, a mask preview toggle and zoom controls. The wheel zooms at the cursor, the space bar pans.
- Mode. Six tabs that decide what the edit does.
- Model. Which engine runs the edit. A badge says whether it respects the mask (MASK) or processes the whole picture (WHOLE IMAGE), and the price or Included in plan sits next to it.
- Edit description. One or two sentences about what should appear in the selected area.
- IDA Q. Two ready buttons that run FOTOhub's own queue models, with the price and a notice that they process outside the EU.
- Mask layers, Edge softness and FOTOhub tools. Lower in the right panel: the list of your selections, one slider and a set of single-purpose tools.
How masks are made
A mask is the part of the picture the AI may change. In the editor it appears as a blue overlay; white on the exported mask means edit, black means keep. Every selection you make becomes a layer, so you can build the mask from several pieces and hide, refine or delete each one.
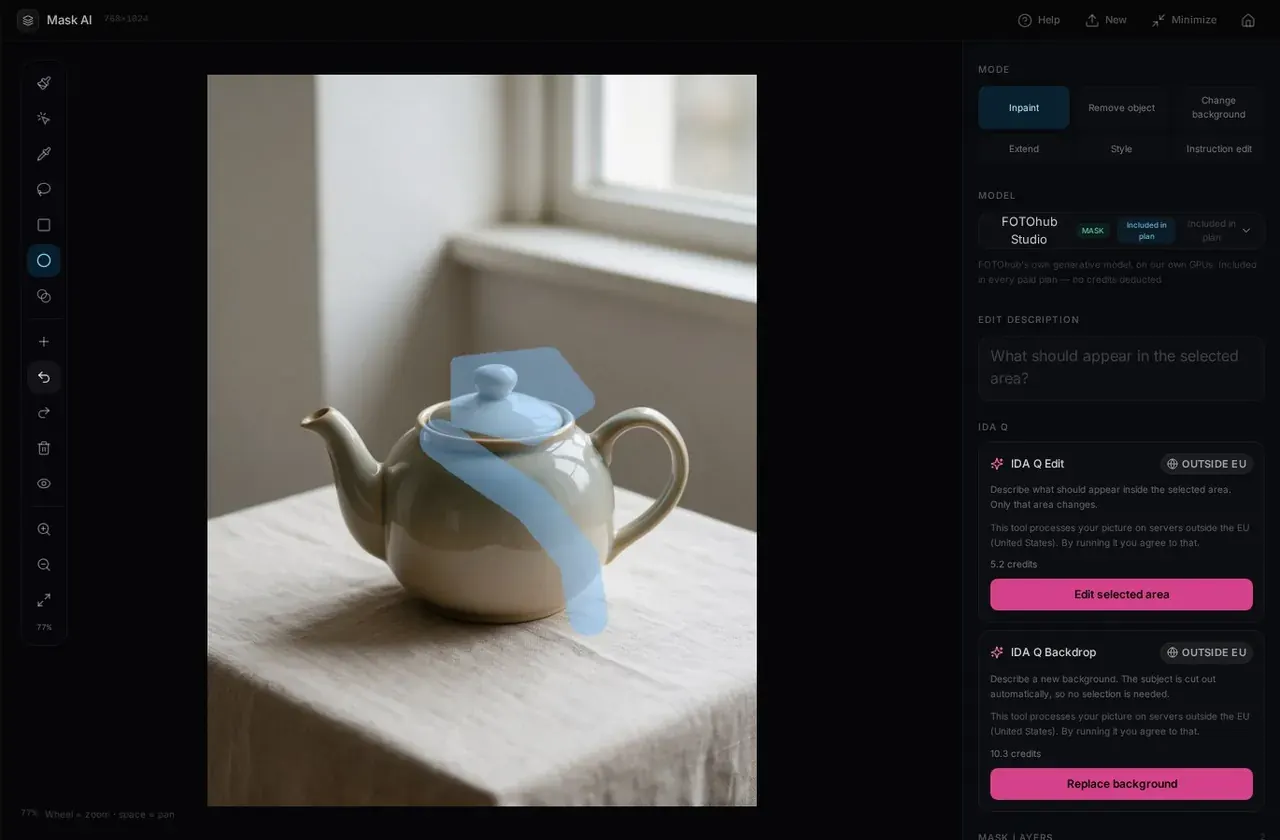
| Tool | Key | Use it for |
|---|---|---|
| Brush | D | Paint the area to change. Size with the slider or Alt plus the wheel; the size is measured on the photo, so zooming does not change it |
| Auto-select | Click an object and the AI finds its edges: left click adds, right click subtracts | |
| Magic wand | Select similar colours: a flat wall, a sky. Tolerance decides how different a shade can be; start at 32. Turn off contiguous to catch every similar patch in the photo | |
| Lasso | L | Trace an irregular outline freehand; the shape closes itself |
| Rectangle | A box: a banner, a crop, a whole section | |
| Ellipse | Round things: faces, plates, a bowl | |
| Gradient | G | A soft transition: drag a line, the start is no change, the end is full change. For skies and vignettes |
- Add and subtract. The plus button (or the
Ekey) switches between adding to the selection and cutting away from it. Use subtract when a selection spilled over an edge. - Edge softness. One slider, 15 percent by default. Zero is a hard cut; raise it for hair and fur, lower it for objects.
- Stroke strength. Below 100 percent the brush builds a selection up gradually in layers.
- Mask expansion. Grows the mask by a few pixels before it reaches the model. Helps when a rim of the old image remains at the edge of an edit; 0.01 to 0.05 is usually enough.
- Per-layer description. Each layer can carry its own text. Generating all layers sends a separate request per layer, so the cost grows with the number of layers.
Modes, models and what they cost
| Mode | Needs | What happens |
|---|---|---|
| Inpaint | A mask and a description | Fills the selection with what you describe; the rest is kept |
| Remove object | A mask | Removes the object and rebuilds the background; no description needed |
| Change background | Sometimes a mask | Replaces the background and keeps the foreground; some engines find the background themselves |
| Extend | Dragging the blue handles at the edges | Paints beyond the frame, up to 2000 pixels per side |
| Style | A mask and a style description | Restyles the selected area; describe the style, not the content |
| Instruction edit | An instruction; a mask is optional | FOTOhub AI edits by instruction; with a mask only that area changes |
The model list changes with the mode. Two things are worth knowing before you choose one. A MASK model changes only the selection. A WHOLE IMAGE model re-renders the whole picture and treats your selection as a hint, so it can alter areas you did not mark; pick MASK models when the rest of the photo must stay exactly as it is. And every model shows its price, or Included in plan, next to its name, and the Generate button repeats it, so you know before you press.
- FOTOhub Studio and FOTOhub Remover run on FOTOhub's own GPUs. Studio is listed as included in paid plans, Remover removes an object without a prompt at a low price. When the GPUs are busy or unavailable the screen reports an error instead of a picture; see the troubleshooting section.
- IDA Q Edit changes only the selected area, following your description. It runs in a queue on servers outside the EU (the screen says so and asks you to accept it) and the price is shown on its button.
- IDA Q Backdrop replaces the background from a description; it cuts the subject out itself, so a selection is not used.
- FOTOhub AI powers Instruction edit. It offers a fast mode (about 45 seconds) and a best-quality mode (about 6 minutes), with the cost shown for each.
- The picker also lists partner models. They are labelled MASK or WHOLE IMAGE like the rest.
Your first edit, step by step
- Load the picture Choose an image or take one from your library. The size in pixels appears next to the title.
- Pick the mode Click Inpaint to put something new into a spot, Remove object to take something out.
- Mark the area Choose a selection tool and mark the spot. Make the mark a little bigger than the object.
- Describe the change Write what should appear in the selected area. Describe the object and the light, not the whole photo. For removal, leave the field empty.
- Run it Press the Generate button of the model, or Edit selected area under IDA Q. The button carries the price. IDA Q Edit runs in a queue and can take several minutes.
- Check the result and keep going The picture on the canvas is now the result and the title shows Iteration 2. Press Before to see the original, Undo edit to go back, or edit the result again: every new edit starts from the latest picture.
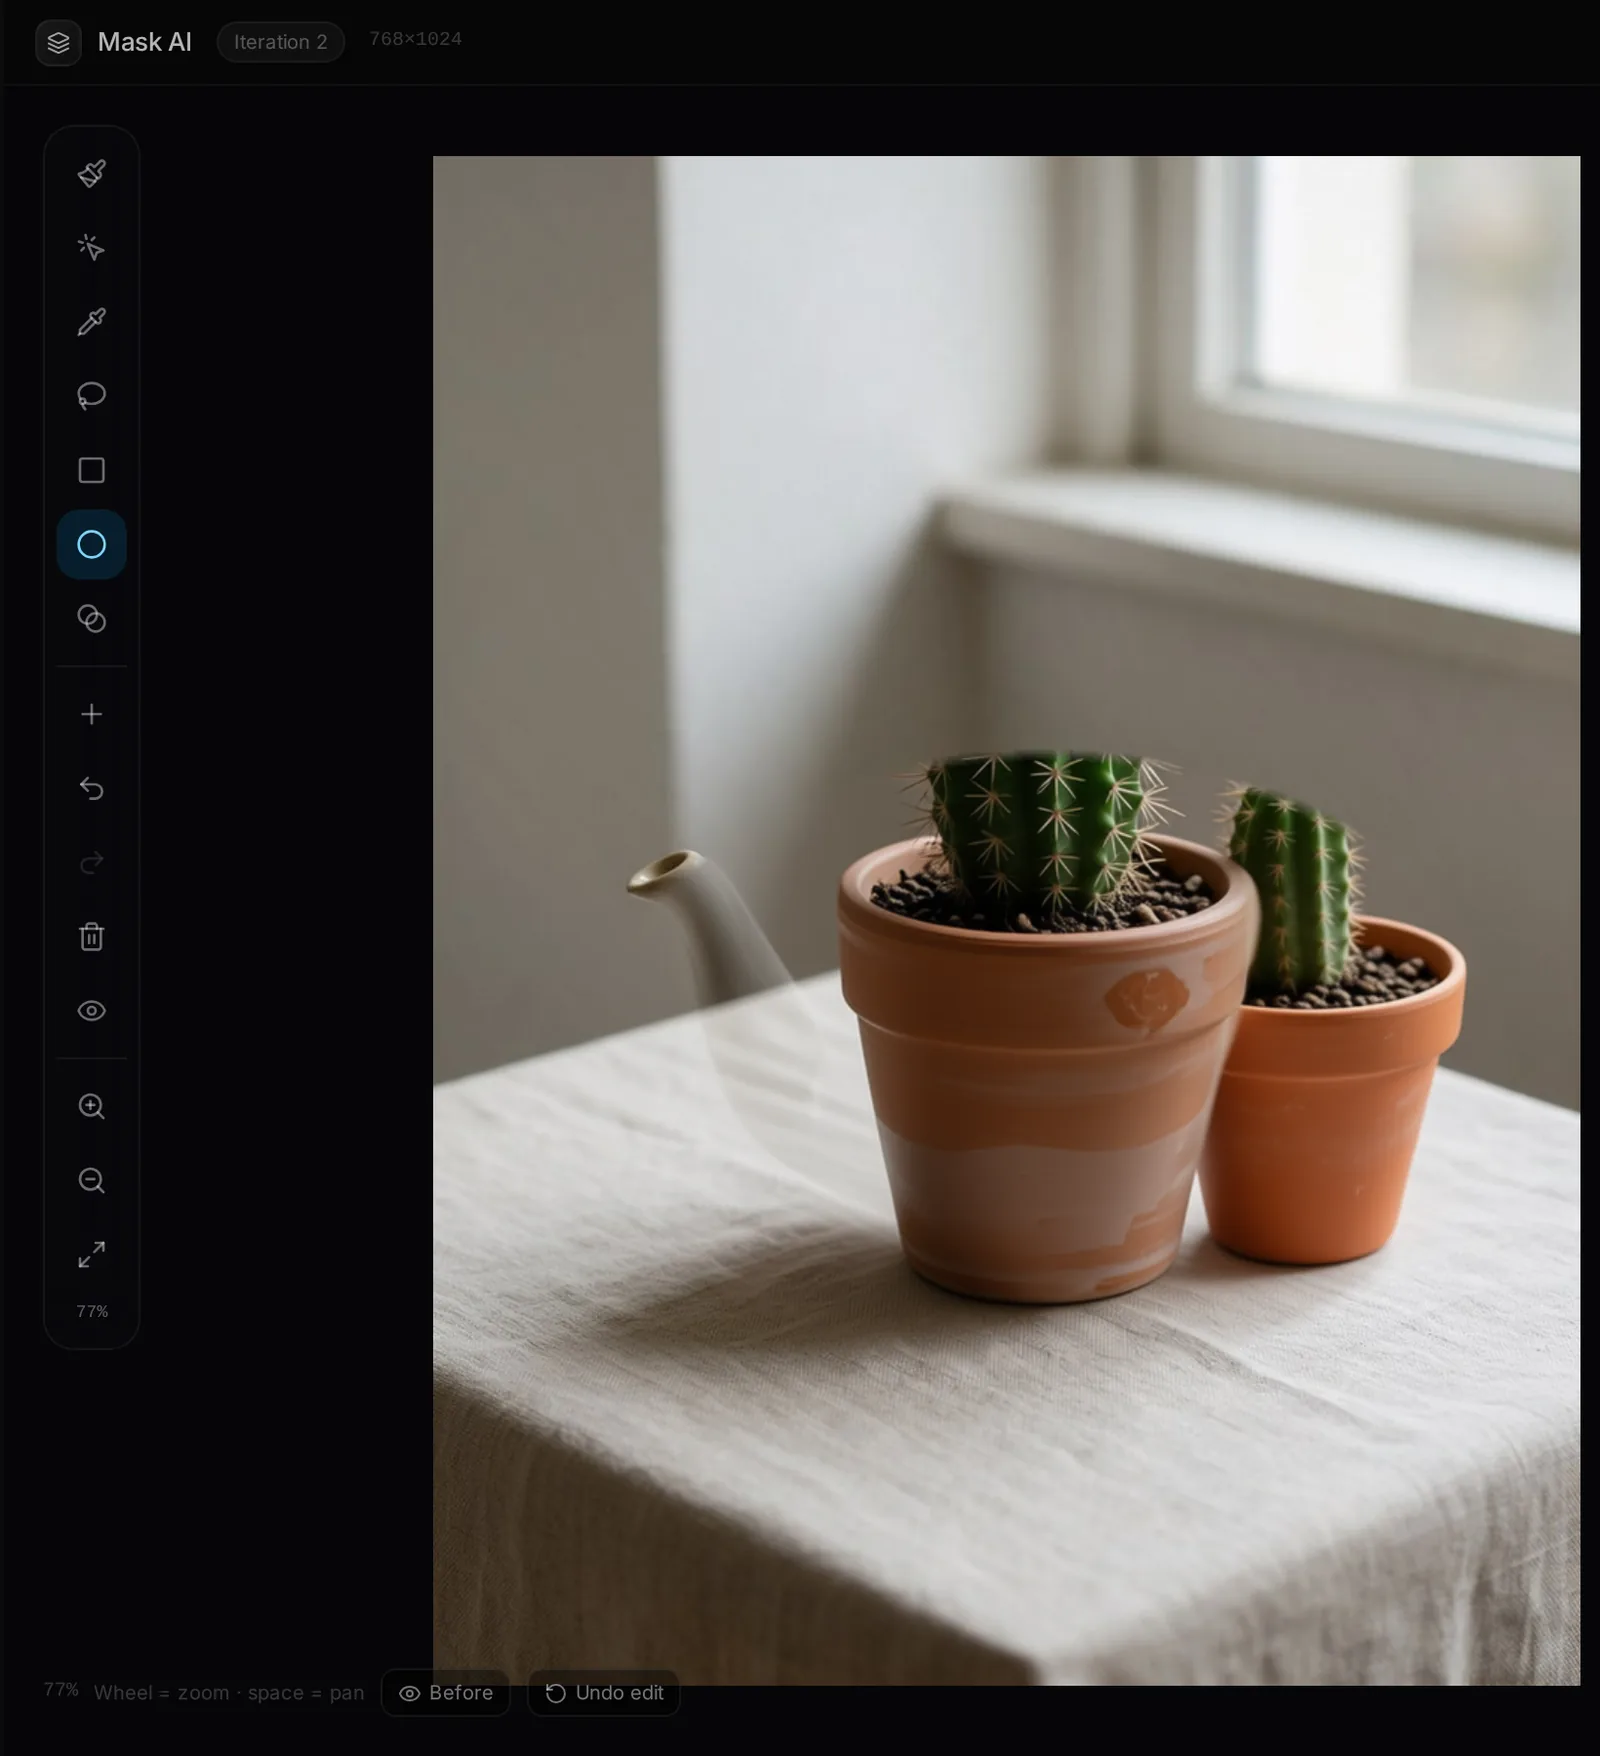
Replace the teapot with a cactus (and see a ghost)
Goal. Swap the teapot for a plant with IDA Q Edit.
Input you can copy.
Prompt: a small potted cactus in a terracotta pot| Setting | Value |
|---|---|
| Mode | Inpaint |
| Mask | One ellipse over the teapot body |
| Engine | IDA Q Edit |
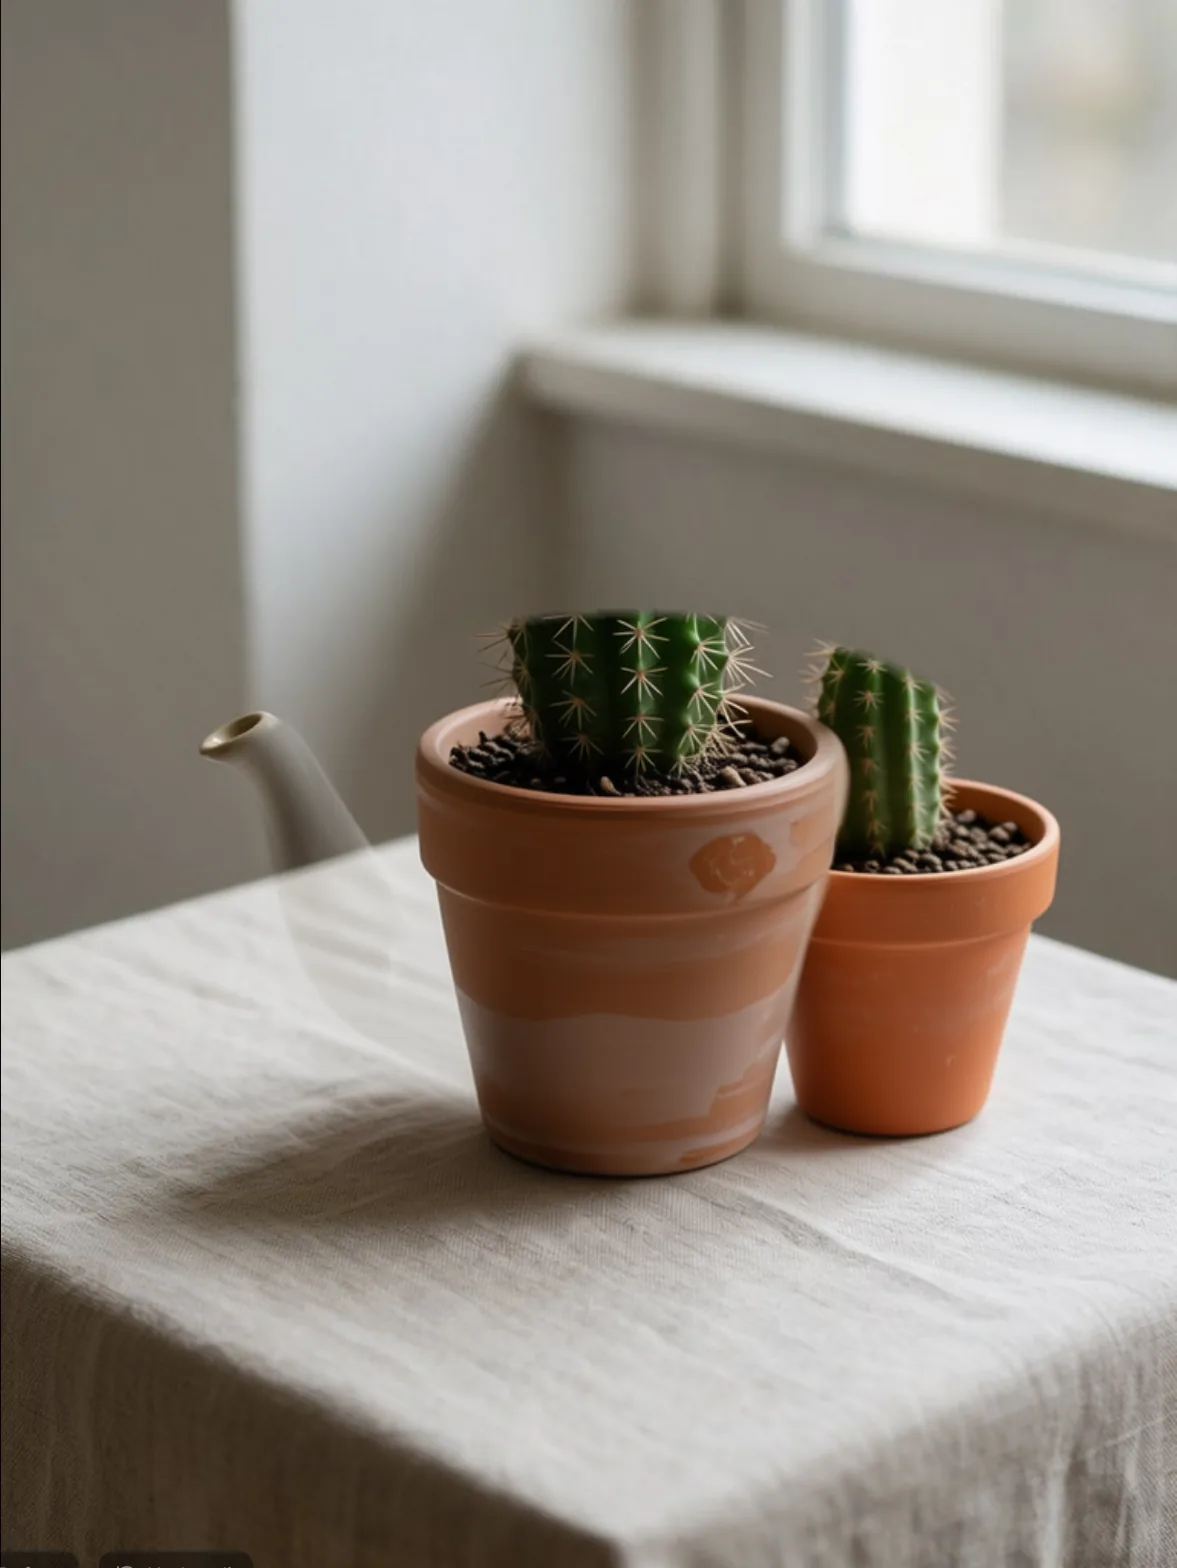
Why it works. Two cacti stand on the linen in the same side light. The ellipse did not cover the tip of the spout, so a ghost of it remains on the left. The mask was the problem, not the prompt: widen the selection until it covers the whole object with a margin, or add a second shape over the spot, then run again.
A bigger mask, a different surprise
Goal. Cover the whole teapot with a generous rectangle and ask for something quite different.
Input you can copy.
Prompt: a stack of three blue ceramic bowls| Setting | Value |
|---|---|
| Mode | Inpaint |
| Mask | A large rectangle around the teapot |
| Engine | IDA Q Edit |
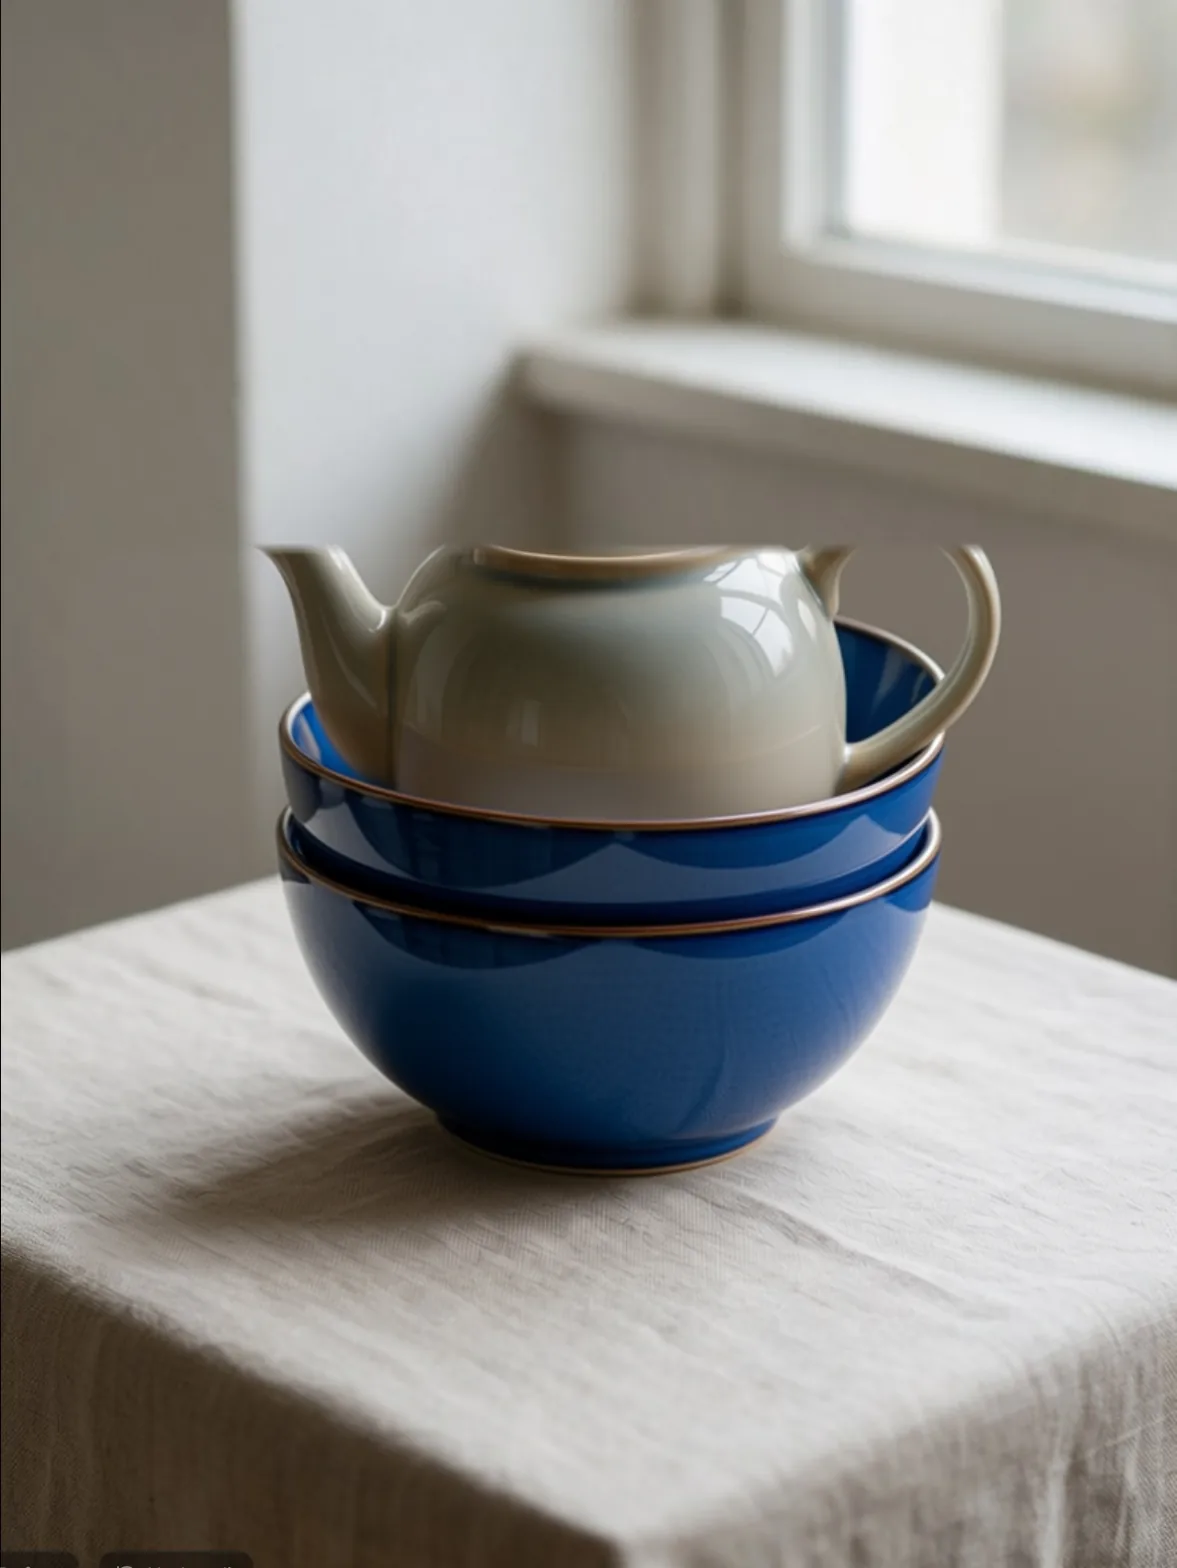
Why it works. The spot is filled with blue bowls, but the AI built two, not three, and kept the teapot body sitting on top of them, as if it were part of the scene to respect. When you want an object fully replaced, run Remove object first, then Inpaint into the empty spot. Two short steps are more predictable than one big change.
Instruction edit: say what to change
Instruction edit trades the mask-and-describe routine for a plain instruction, in the manner of telling a retoucher what you want. The mask is optional: with one, only the marked area changes, without it the whole picture follows the instruction. The panel shows two modes, Fast (about 45 seconds) and Best quality (about 6 minutes), and the cost of each.
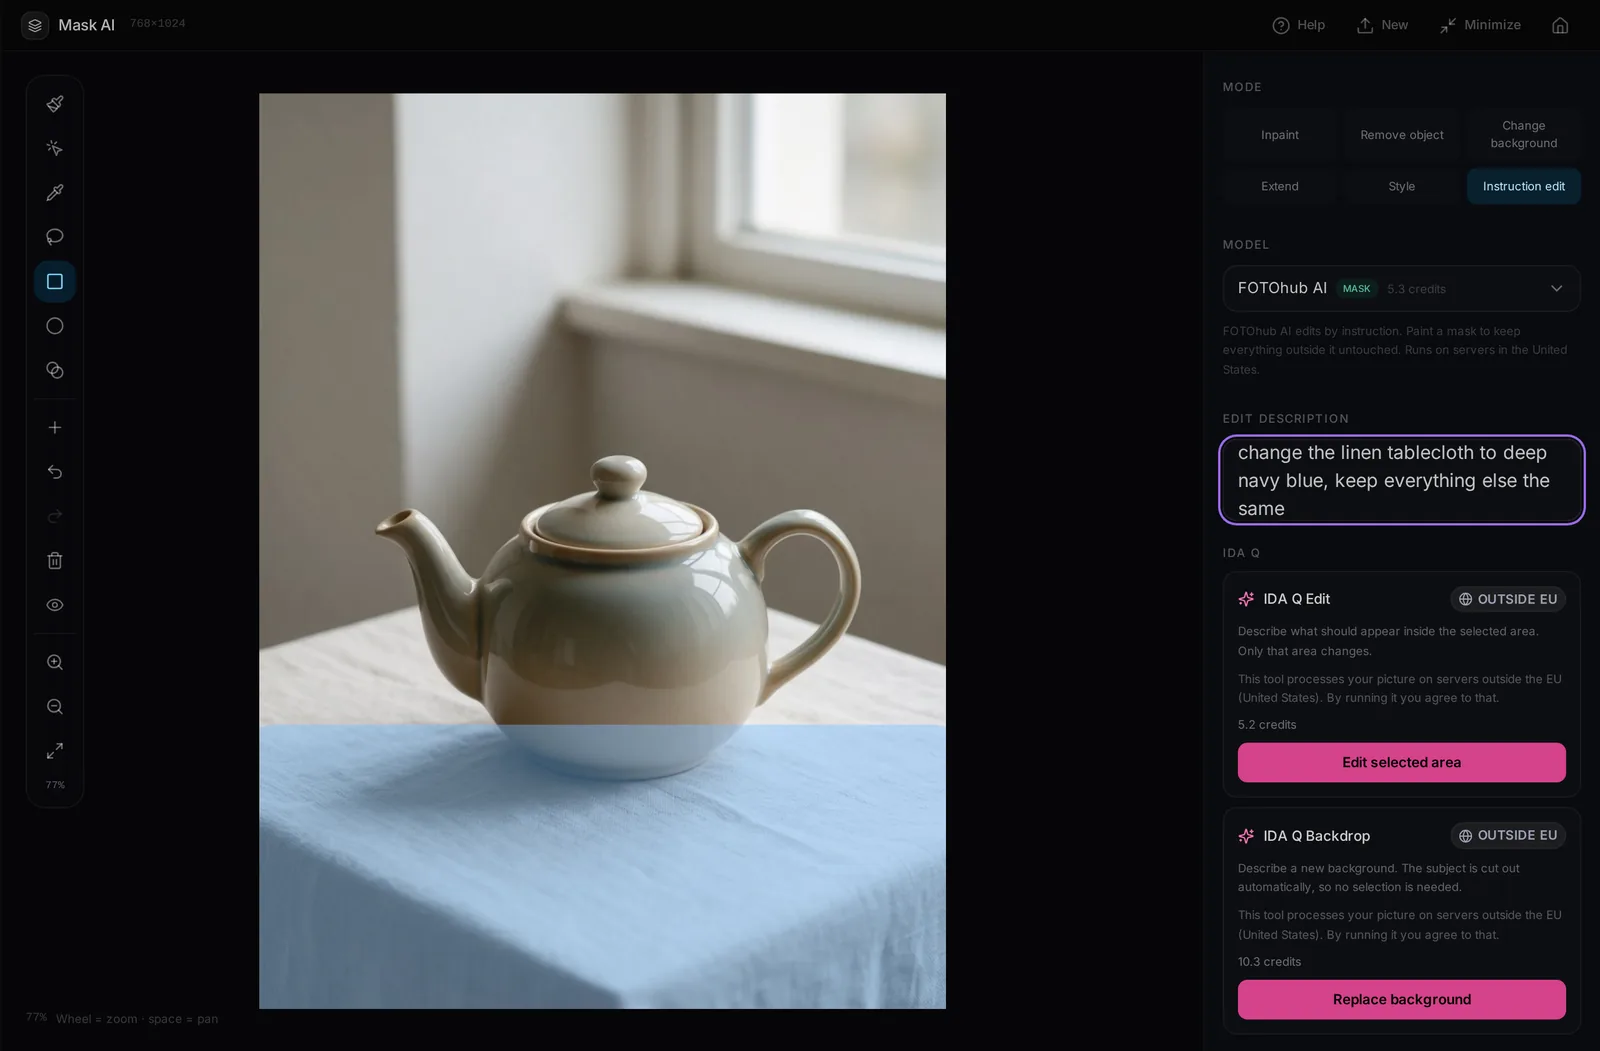
Recolour the tablecloth
Goal. Change one surface to another colour while leaving the teapot alone.
Input you can copy.
change the linen tablecloth to deep navy blue, keep everything else the same| Setting | Value |
|---|---|
| Mode | Instruction edit |
| Mask | A rectangle over the lower part of the picture |
| Engine | FOTOhub AI |
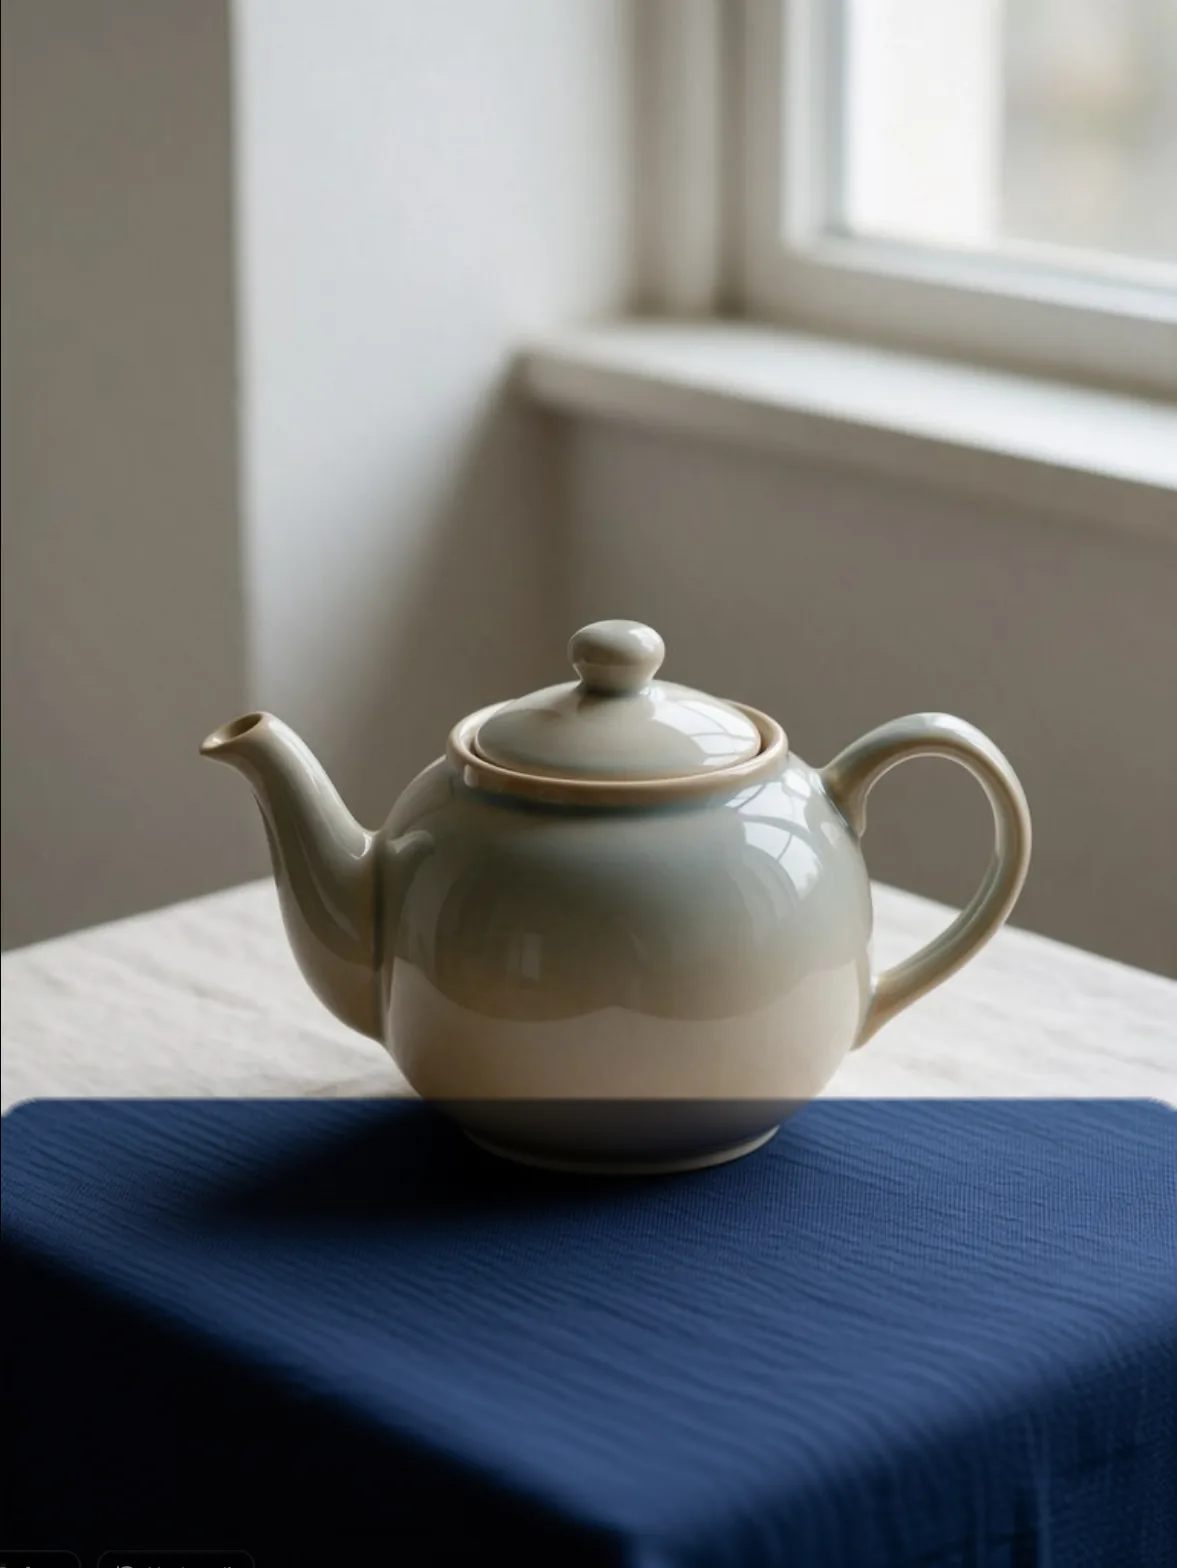
Why it works. The front of the cloth is now navy and the teapot did not change, so the mask did its job. The result also shows the rule of masks: where the rectangle ended there is a hard edge, and the cloth behind the teapot stays pale. Paint the whole surface you want to change, with the lasso or the wand on the cloth, and the colour will be even.
Results, comparison and next steps
- Before shows the original, Undo edit brings the previous version back.
- Iteration N in the title counts how many edits stack up on this picture.
- Results at the bottom of the right panel lists every result of the session as small thumbnails.
- Continue with… opens the shared menu of next steps for the result, such as sending it to the photo editor, Design Studio or image to video.
- New at the top loads a different picture.
Limits, price and privacy
| Topic | How it works |
|---|---|
| Start image | PNG, JPG or WebP, up to 20 MB |
| Price | Shown next to each model and again in the button that runs it; Included in plan appears for the FOTOhub model that is part of paid plans |
| Several layers | Generating every layer sends one request per layer, so the price grows with the layers |
| Queue models | IDA Q Edit, IDA Q Backdrop and Instruction edit run as queued jobs. IDA Q Edit took about four and a half minutes in our test; Instruction edit Fast about 45 seconds |
| Where it runs | IDA Q buttons say Processed outside the EU and ask you to accept it. Instruction edit says it runs on servers in the United States. Other models follow their own notice in the picker |
| Extend | Up to 2000 pixels per side |
Troubleshooting and FAQ
- Auto-select shows Auto-select failed.
- Press Retry. If it keeps failing, select with the Magic wand, the Lasso or a shape instead; they ran fine when we tried them.
- An FOTOhub GPU tool answers Failed to fetch or shows a technical error.
- The GPU service did not answer. Nothing was produced. Try again later, or use IDA Q Edit or Instruction edit, which run on a different path.
- A ghost of the old object is still visible.
- The mask missed part of it. Widen the selection with a margin, raise Mask expansion a little, or run Remove object first and then Inpaint.
- The model changed things outside my selection.
- You probably picked a WHOLE IMAGE model, which treats the selection as a hint. Choose a MASK model, or Instruction edit with a mask.
- Why is there a hard line where my mask ended?
- With Edge softness at zero or a rectangle that stops mid-surface, the change stops abruptly. Select the whole surface and keep Edge softness above zero.
- Do I need a description for Remove object?
- No. Mask the object with a little margin and run. The description is optional there.
- Can I keep working after a result?
- Yes. The result becomes the current picture and the next edit starts from it. Use Before and Undo edit to compare and step back.